Contact information and branding
You can add your personal or clinic branding to Embodia. Your branding will be applied to your online booking portal, printed material that you can hand to your patients, and email communications that patients receive from Embodia on your behalf.
Branding can be added for both individual memberships and clinic memberships.
Note: The actions described in this lesson require a Manager permission on your clinic.
Adding info and branding for your clinic
To add your practice's information and branding, click on the Settings tab in the top nav bar, and then Communication & branding > Contact info and branding.
Depending on your membership, you will be able to add the following:
- Contact Info: Your general email address, phone number, and website where your clients can contact you if they have any questions.
- Address: This should be the physical location of your clinic, where clients will go for any in-person treatment (Clinic memberships only).
- Branding: Here you can provide your logo, and your primary and secondary colours.
- Email communication: Settings to change the default behaviour of how Embodia sends emails to your clients on your behalf.
- Billing info: Specify additional information for invoices such as your business tax number, corporation number, etc. (Practice Management users only).
Contact info
Under the Contact info tab, you can add your contact information, such as your email, phone number, and website.

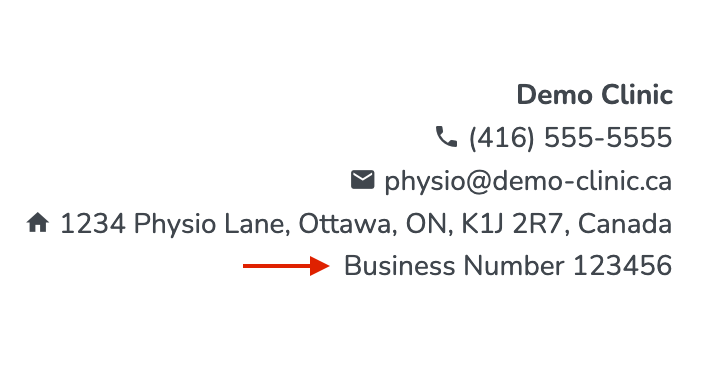
Your contact information will be displayed on the online booking portal, the footer of the emails patients receive, as well as on your receipts and printed material. For instance, below is a screenshot of some demo branding applied to a printout of an exercise program.

Address
Available to Clinic memberships only (Patient Engagement members can opt for a Clinic membership, while all Practice Management members already have a Clinic membership)
Under the Address tab, you can add the physical location of your clinic, where clients will go for their in-person treatment. This information will also be displayed on the online booking portal as well as on your receipts and printed material. This tab will only be available for clinic memberships.

Branding
Under the Branding tab, you can add your logo, and the HEX codes for your primary and secondary colours.

Where you'll see your branding
- Your logo will be added at the top of the first page of printed material (ex. exercise programs, invoices, etc.)
- Your logo and colours will be used to add your branding to your online booking portal, as well as email communications sent to patients.
For instance, below is the email sent to patients when a new education is shared with them (Left: Embodia's default branding, Right: Demo Clinic custom branding).

Email communication
Under the Email communication tab, you can override the default values used in email communications with the patient, such as:
- The "Reply-to" email address. When the patient replies to an email, their reply will get delivered to that email address. By default, the "Reply-to" email address is support@embodiaapp.com. We highly recommend changing this to an email address that you own so you receive their replies.
- The "From" field is the name that will appear as the sender name. By default, the sender is Embodia. We highly recommend changing this to your name or your clinic's name.
- The Email signature is the signature to include at the end of default email communications. By default, this says "Your partners in health, The Embodia Team".
Billing info
Available to Practice Management members only
Under the Billing info tab is a free-text section where you can provide additional information to be included on patient invoices.
This may be information such as your business tax number, corporation number, etc. (but not your registration or licensing number(s)).
What you add here will appear in the top right corner of your invoices with your clinic's information.
Note: Your registration or licensing number(s) don't need to be added here. Those can be added under My account settings. You can learn more about adding your professional license number(s) in our Adding your registration number guide.